Petter Reinholdtsen

Entries from October 2018.

Measuring the speaker frequency response using the AUDMES free software GUI - nice free software
22nd October 2018

My current home stereo is a patchwork of various pieces I got on flee markeds over the years. It is amazing what kind of equipment show up there. I've been wondering for a while if it was possible to measure how well this equipment is working together, and decided to see how far I could get using free software. After trawling the web I came across an article from DIY Audio and Video on Speaker Testing and Analysis describing how to test speakers, and it listing several software options, among them AUDio MEasurement System (AUDMES). It is the only free software system I could find focusing on measuring speakers and audio frequency response. In the process I also found an interesting article from NOVO on Understanding Speaker Specifications and Frequency Response and an article from ecoustics on Understanding Speaker Frequency Response, with a lot of information on what to look for and how to interpret the graphs. Armed with this knowledge, I set out to measure the state of my speakers.

The first hurdle was that AUDMES hadn't seen a commit for 10 years and did not build with current compilers and libraries. I got in touch with its author, who no longer was spending time on the program but gave me write access to the subversion repository on Sourceforge. The end result is that now the code build on Linux and is capable of saving and loading the collected frequency response data in CSV format. The application is quite nice and flexible, and I was able to select the input and output audio interfaces independently. This made it possible to use a USB mixer as the input source, while sending output via my laptop headphone connection. I lacked the hardware and cabling to figure out a different way to get independent cabling to speakers and microphone.

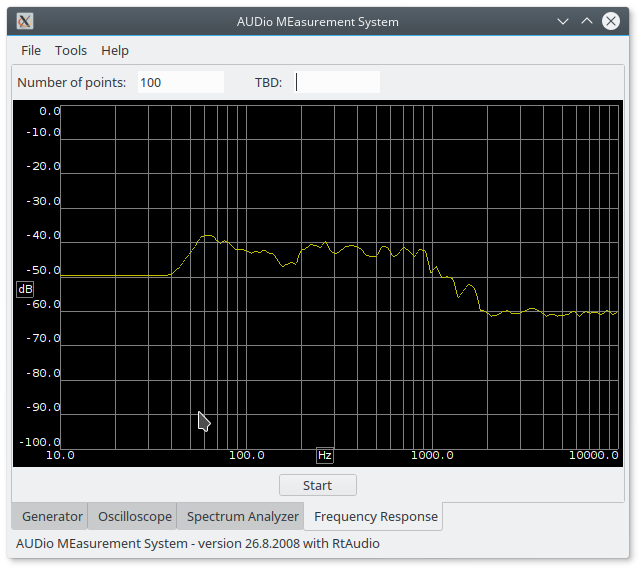
Using this setup I could see how a large range of high frequencies apparently were not making it out of my speakers. The picture show the frequency response measurement of one of the speakers. Note the frequency lines seem to be slightly misaligned, compared to the CSV output from the program. I can not hear several of these are high frequencies, according to measurement from Free Hearing Test Software, an freeware system to measure your hearing (still looking for a free software alternative), so I do not know if they are coming out out the speakers. I thus do not quite know how to figure out if the missing frequencies is a problem with the microphone, the amplifier or the speakers, but I managed to rule out the audio card in my PC by measuring my Bose noise canceling headset using its own microphone. This setup was able to see the high frequency tones, so the problem with my stereo had to be in the amplifier or speakers.

Anyway, to try to role out one factor I ended up picking up a new set of speakers at a flee marked, and these work a lot better than the old speakers, so I guess the microphone and amplifier is OK. If you need to measure your own speakers, check out AUDMES. If more people get involved, perhaps the project could become good enough to include in Debian? And if you know of some other free software to measure speakers and amplifier performance, please let me know. I am aware of the freeware option REW, but I want something that can be developed also when the vendor looses interest.

As usual, if you use Bitcoin and want to show your support of my activities, please send Bitcoin donations to my address 15oWEoG9dUPovwmUL9KWAnYRtNJEkP1u1b.

Tags: english, nice free software.
Web browser integration of VLC with Bittorrent support
21st October 2018

Bittorrent is as far as I know, currently the most efficient way to distribute content on the Internet. It is used all by all sorts of content providers, from national TV stations like NRK, Linux distributors like Debian and Ubuntu, and of course the Internet archive.

Almost a month ago a new package adding Bittorrent support to VLC became available in Debian testing and unstable. To test it, simply install it like this:

apt install vlc-plugin-bittorrent

Since the plugin was made available for the first time in Debian, several improvements have been made to it. In version 2.2-4, now available in both testing and unstable, a desktop file is provided to teach browsers to start VLC when the user click on torrent files or magnet links. The last part is thanks to me finally understanding what the strange x-scheme-handler style MIME types in desktop files are used for. By adding x-scheme-handler/magnet to the MimeType entry in the desktop file, at least the browsers Firefox and Chromium will suggest to start VLC when selecting a magnet URI on a web page. The end result is that now, with the plugin installed in Buster and Sid, one can visit any Internet Archive page with movies using a web browser and click on the torrent link to start streaming the movie.

Note, there is still some misfeatures in the plugin. One is the fact that it will hang and block VLC from exiting until the torrent streaming starts. Another is the fact that it will pick and play a random file in a multi file torrent. This is not always the video file you want. Combined with the first it can be a bit hard to get the video streaming going. But when it work, it seem to do a good job.

For the Debian packaging, I would love to find a good way to test if the plugin work with VLC using autopkgtest. I tried, but do not know enough of the inner workings of VLC to get it working. For now the autopkgtest script is only checking if the .so file was successfully loaded by VLC. If you have any suggestions, please submit a patch to the Debian bug tracking system.

As usual, if you use Bitcoin and want to show your support of my activities, please send Bitcoin donations to my address 15oWEoG9dUPovwmUL9KWAnYRtNJEkP1u1b.

Tags: english, verkidetfri, video.
Release 0.2 of free software archive system Nikita announced
18th October 2018

This morning, the new release of the Nikita Noark 5 core project was announced on the project mailing list. The free software solution is an implementation of the Norwegian archive standard Noark 5 used by government offices in Norway. These were the changes in version 0.2 since version 0.1.1 (from NEWS.md):

The changes and improvements are extensive. Running diffstat on the changes between git tab 0.1.1 and 0.2 show 1098 files changed, 108666 insertions(+), 54066 deletions(-).

If free and open standardized archiving API sound interesting to you, please contact us on IRC (#nikita on irc.freenode.net) or email (nikita-noark mailing list).

As usual, if you use Bitcoin and want to show your support of my activities, please send Bitcoin donations to my address 15oWEoG9dUPovwmUL9KWAnYRtNJEkP1u1b.

Tags: english, noark5, nuug, offentlig innsyn, standard.
Fetching trusted timestamps using the rfc3161ng python module
8th October 2018

I have earlier covered the basics of trusted timestamping using the 'openssl ts' client. See blog post for 2014, 2016 and 2017 for those stories. But some times I want to integrate the timestamping in other code, and recently I needed to integrate it into Python. After searching a bit, I found the rfc3161 library which seemed like a good fit, but I soon discovered it only worked for python version 2, and I needed something that work with python version 3. Luckily I next came across the rfc3161ng library, a fork of the original rfc3161 library. Not only is it working with python 3, it have fixed a few of the bugs in the original library, and it has an active maintainer. I decided to wrap it up and make it available in Debian, and a few days ago it entered Debian unstable and testing.

Using the library is fairly straight forward. The only slightly problematic step is to fetch the required certificates to verify the timestamp. For some services it is straight forward, while for others I have not yet figured out how to do it. Here is a small standalone code example based on of the integration tests in the library code:

#!/usr/bin/python3

"""

Python 3 script demonstrating how to use the rfc3161ng module to
get trusted timestamps.

The license of this code is the same as the license of the rfc3161ng
library, ie MIT/BSD.

"""

import os
import pyasn1.codec.der
import rfc3161ng
import subprocess
import tempfile
import urllib.request

def store(f, data):
    f.write(data)
    f.flush()
    f.seek(0)

def fetch(url, f=None):
    response = urllib.request.urlopen(url)
    data = response.read()
    if f:
        store(f, data)
    return data

def main():
    with tempfile.NamedTemporaryFile() as cert_f,\
    	 tempfile.NamedTemporaryFile() as ca_f,\
    	 tempfile.NamedTemporaryFile() as msg_f,\
    	 tempfile.NamedTemporaryFile() as tsr_f:

        # First fetch certificates used by service
        certificate_data = fetch('https://freetsa.org/files/tsa.crt', cert_f)
        ca_data_data = fetch('https://freetsa.org/files/cacert.pem', ca_f)

        # Then timestamp the message
        timestamper = \
            rfc3161ng.RemoteTimestamper('http://freetsa.org/tsr',
                                        certificate=certificate_data)
        data = b"Python forever!\n"
        tsr = timestamper(data=data, return_tsr=True)

        # Finally, convert message and response to something 'openssl ts' can verify
        store(msg_f, data)
        store(tsr_f, pyasn1.codec.der.encoder.encode(tsr))
        args = ["openssl", "ts", "-verify",
                "-data", msg_f.name,
	        "-in", tsr_f.name,
		"-CAfile", ca_f.name,
                "-untrusted", cert_f.name]
        subprocess.check_call(args)

if '__main__' == __name__:
   main()

The code fetches the required certificates, store them as temporary files, timestamp a simple message, store the message and timestamp to disk and ask 'openssl ts' to verify the timestamp. A timestamp is around 1.5 kiB in size, and should be fairly easy to store for future use.

As usual, if you use Bitcoin and want to show your support of my activities, please send Bitcoin donations to my address 15oWEoG9dUPovwmUL9KWAnYRtNJEkP1u1b.

Tags: english, noark5, sikkerhet.
Automatic Google Drive sync using grive in Debian
4th October 2018

A few days, I rescued a Windows victim over to Debian. To try to rescue the remains, I helped set up automatic sync with Google Drive. I did not find any sensible Debian package handling this automatically, so I rebuild the grive2 source from the Ubuntu UPD8 PPA to do the task and added a autostart desktop entry and a small shell script to run in the background while the user is logged in to do the sync. Here is a sketch of the setup for future reference.

I first created ~/googledrive, entered the directory and ran 'grive -a' to authenticate the machine/user. Next, I created a autostart hook in ~/.config/autostart/grive.desktop to start the sync when the user log in:

[Desktop Entry]
Name=Google drive autosync
Type=Application
Exec=/home/user/bin/grive-sync

Finally, I wrote the ~/bin/grive-sync script to sync ~/googledrive/ with the files in Google Drive.

#!/bin/sh
set -e
cd ~/
cleanup() {
    if [ "$syncpid" ] ; then
        kill $syncpid
    fi
}
trap cleanup EXIT INT QUIT
/usr/lib/grive/grive-sync.sh listen googledrive 2>&1 | sed "s%^%$0:%" &
syncpdi=$!
while true; do
    if ! xhost >/dev/null 2>&1 ; then
        echo "no DISPLAY, exiting as the user probably logged out"
        exit 1
    fi
    if [ ! -e /run/user/1000/grive-sync.sh_googledrive ] ; then
        /usr/lib/grive/grive-sync.sh sync googledrive
    fi
    sleep 300
done 2>&1 | sed "s%^%$0:%"

Feel free to use the setup if you want. It can be assumed to be GNU GPL v2 licensed (or any later version, at your leisure), but I doubt this code is possible to claim copyright on.

As usual, if you use Bitcoin and want to show your support of my activities, please send Bitcoin donations to my address 15oWEoG9dUPovwmUL9KWAnYRtNJEkP1u1b.

Tags: debian, english.

RSS Feed

Created by Chronicle v4.6